
HOUSEHOLD}
HINTS
Do you Remember These....
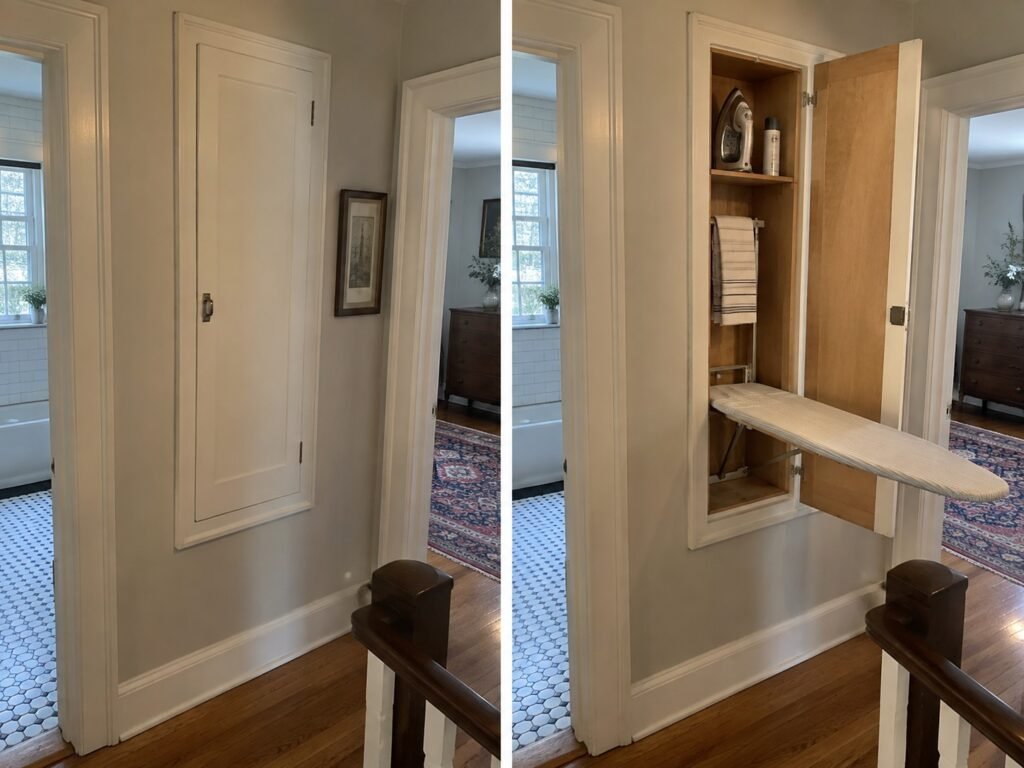
Built-In Ironing Boards
Long before today’s lightweight folding ironing boards and steamers, many homes featured a built-in ironing board cabinet tucked neatly into a kitchen, hallway, utility room, or laundry area. The ironing board folded vertically into a shallow wall cabinet and could be pulled down whenever it was needed, then hidden away again when the ironing was finished.
Built-in ironing boards began appearing in homes in the early 1900s. U.S. patents for wall-mounted and cabinet-style ironing boards date back to at least 1916, and by the 1920s and 1930s they had become a popular space-saving feature in new homes. Home-design publications of the period promoted fold-down ironing boards as one of the modern conveniences that made housekeeping more efficient.
Their popularity continued into the 1940s, when built-in ironing stations could still be found in well-equipped kitchens and laundry rooms. Some cabinets even included a special compartment for storing the iron.
By the 1950s and 1960s, however, portable collapsible ironing boards became increasingly practical and easy to store, and built-in cabinets gradually became less common in new-home construction.
Today, finding an original built-in ironing board cabinet can be a charming reminder of how homes were designed around everyday household routines. Some homeowners restore them and still use them, while others turn the little recessed cabinets into spice racks, shelves, or decorative storage.
Have you ever seen one of these hiding in an older home?
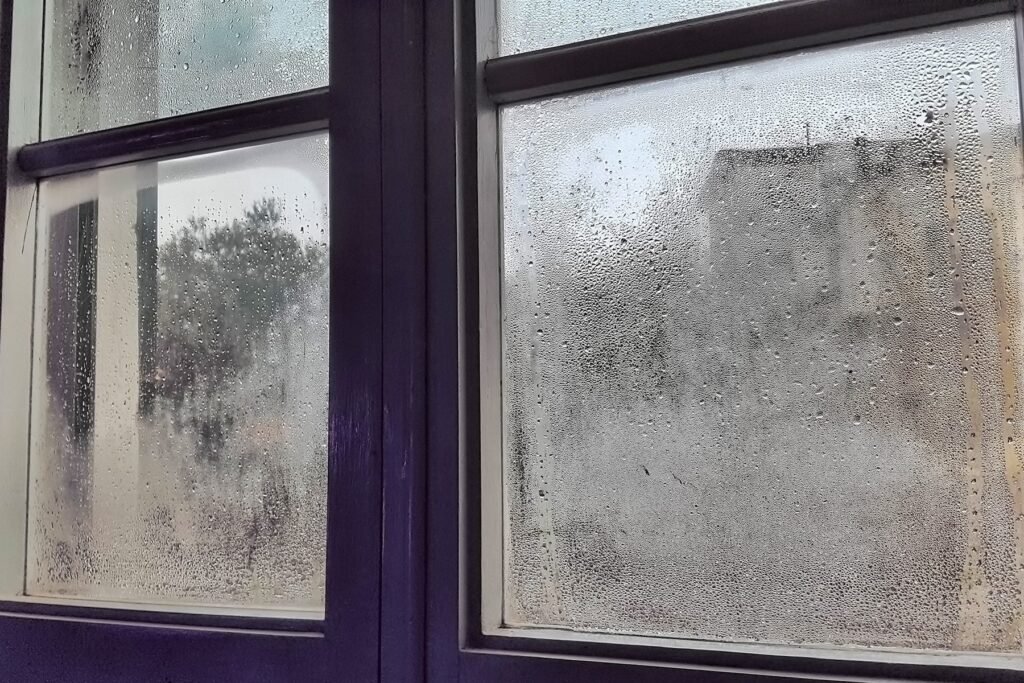
How to Avoid Window Condensation
What causes window condensation
Fog or frost on your windows is caused by condensation. Condensation happens when the temperature of the glass is at or below the dew point of the air in your house. If the glass temperature in below freezing, then frost will form on your windows. The dew point is related to relative humidity. If the air in your house is very dry, your window glass would have to be very cold for condensation to form. On the other hand, warm air can be so humid that it condenses even on a relatively warm bathroom mirror. So what does all of this have to do with your windows? Two things: First, if the humidity in your house is too high, there’s a greater likelihood of condensation forming on the glass. And second, if your window glass is too cold, condensation will form more readily.
There are two parts to preventing window condensation and frosty windows:
Part 1 – Reduce indoor humidity.
Since cold air tends to be drier, many people in colder climates run a humidifier to make the air more comfortable. And this is fine, but too much humidity is a bad thing. If condensation is forming on your windows, it also could be forming inside of your walls, causing mold or other problems. The other sources of indoor humidity are people, showers, cooking, leaky dryer vents and even houseplants. So if your windows are fogging up or frosting over here are some things you can do to reduce indoor humidity:
- Lower the setting on your humidifier.
- Turn on the bath fan when you’re showering.
- Run the kitchen exhaust fan when you’re boiling water.
- Check your dryer exhaust vent. Repair loose vent pipes and cover seams with duct tape.
Part 2 – Add a layer of glass or plastic to your windows.
There are several ways to add a layer of glazing to your windows. You can add storm windows, install heat-shrink plastic film or upgrade to double- or triple-glazed windows.
Additional layers of glazing provide better insulation and increase the temperature of the interior layer of glazing. Suppose it’s 25 degrees F outdoors and you have single glazed windows. The interior temperature of the glass probably wouldn’t be much above freezing. And at that temperature, even relatively dry air would condense on the glass. But, if you added a storm window, the interior temperature of the glass would be much warmer, and condensation would be less likely to occur. So, adding more layers of glazing allows you to have higher indoor humidity without frosty windows.
To avoid window condensation in winter, you’ll have to determine the right combination of indoor humidity and window insulation that solves the problem of window condensation.
19 Renovations That Instantly Increase Your Home’s Value
Garage door replacement
Number one on Bankrate’s list of renovations that add value to your home is a new garage door. Replacing a garage door is big for curb appeal, and it’s also big for recouping the cost of the project.
According to Bankrate’s estimate, a new garage door costs about $4,500 and can increase your home’s value by as much as $8,750. That’s nearly a 200 percent return on investment.
What Are the Different Types of Foundation Cracks and What Causes Them?
Vertical cracks
These are the most common foundation cracks and are not a real structural concern. Vertical cracks run up and down and are typically caused by normal house settlement and compression and tension on the concrete. New homes can start seeing vertical cracks after just a couple of years.
Horizontal cracks
Horizontal cracks are more common in cement block and brick foundations and can point to a serious problem. Horizontal cracks go from wall to wall and are caused when water pressure and unbalanced soil put strain on the foundation walls. These cracks often happen during a season of heavy rain, especially if you have poor drainage around your home. This pressure will cause the foundation walls to bow inward.
Pro Tip: Make sure all downspouts are emptying far enough away from the home’s foundation. A soil expert can tell you the best distance, depending on your home and soil. At the minimum, downspouts should empty at least four feet away from your home.
Diagonal cracks
Cracks that run diagonally must be monitored as they point to uneven settlement. Diagonal cracks typically occur when sections of your home settle faster than others, or because of changes in soil conditions due to heavy rain or drought. These cracks are common in homes built on a hillside.
Stair-step cracks
Sometimes soil pressure or differential settlement (when a home’s support foundation settles unevenly) can cause foundation cracking along mortar joints between the individual blocks. This is similar to diagonal cracks. These can run throughout the wall and form a stair-step pattern.
Do I Need to Fix the Cracks in My Foundation?
When you do
- Rainwater is seeping through the foundation wall through the cracks and into your basement or crawlspace.
- Bricks or blocks are displaced, or they appear to be pushed in or out from the wall, or the cracking extends through the actual block or brick.
- Any cracks measure more than 1/4-inch wide. However, some experts say cracks more than 1/8-in. wide should be addressed.
- Cracks appear to be growing. This can indicate an ongoing and unresolved problem that could develop into something more serious.
- The foundation wall is bowing inward. This can lead to structural failure of the foundation and even the collapse of the house.
Pro Tip: If you can fit the edge of a dime into the crack, consider getting it looked at or start monitoring it.
How Much Does Window Replacement Cost?
Although there are many motivations for window replacement, one of the most important is energy savings. Contemporary windows feature double- and triple-pane glass and thermally insulated frames, things that weren’t available when older homes were built and energy costs were lower.
Because of the energy-saving benefit, window replacement can increase home value. Homelight estimates an 81 percent return on investment. And with energy prices unlikely to drop, upgrading your windows could save you money in the long run.
A new window generally costs between $600 and $800. What you will pay depends on several factors, including labor. The latter can run from $400 to $500 per window.
Some homeowners may have the DIY skills to install their own windows, depending on window type and placement. Experts say most shouldn’t attempt it.
On average, it costs about $7,500 to professional replace 10 double-hung windows in a typical 2,500 square foot home. High end wooden windows will cost more. But there are ways to lower your window replacement costs.
Factors Affecting Window Replacement Cost
Unlike new windows, window replacements fit inside the existing window frame.
Some of the factors that influence window replacement cost are:
- Window frame material: The most common are vinyl, fiberglass and wood. Less common options include composites and metal (primarily aluminum).
- Window type: All have different price tags and installation requirements (details below).
- Size of window opening: Larger windows cost more than smaller ones.
- Condition of the window opening: Severe rot and deterioration drive up labor costs.
- Window placement: Upper-story windows may call for extra skill and equipment.
- Age of home: Older homes often have non-standard window openings that require custom-made replacements.
- Type of glass: Most contemporary windows have double-pane glass, but triple-pane is available for extra insulation. You can also order windows with tempered or laminated (safety) glass and UV-resistant coatings.
Replacement Costs of Different Types of Windows
For cost estimation, you can classify windows by frame material and window type.
Frame Material
- Aluminum: Aluminum frames are cheap, but they don’t insulate well. They’re usually reserved for utility and commercial windows, although they can be an option for budget-conscious homeowners. Each window unit costs from $100 to $400.
- Vinyl: After aluminum, this is the least expensive frame material. It runs between $200 and $500 for a standard double-hung window.
- Wood: This traditional material never falls out of favor. A double-hung wood window costs between $300 and $600.
- Fiberglass: Fiberglass can be molded to look like wood and offers the best durability and energy efficiency. A double-hung window costs $800 to $2,000.
Window Type
- Single-hung: Found in older homes, these feature a lower sash that slides up and down and a fixed upper sash. A replacement single-hung window costs between $100 and $400.
- Double-hung: These have two sliding sashes that tilt inward, making it safe and easy to clean the outside glass. They cost between $300 and $600.
- Casement: The sash on a casement window pivots on a vertical axis, operated by a crank. An awning window is similar but pivots from the top on a horizontal axis. Replacement costs are between $300 and $600.
- Sliding: These open and close along a horizontal track. Quality varies widely, and so does cost — from $200 to $2,000.
- Picture: These are fixed but often non-standard sizes. Costs range from $300 to $800.
DIY vs. Pro Window Replacement
Window replacement isn’t all that complicated, and in many cases it requires minimal exterior work. You can often remove old sashes from indoors after prying off the molding, pop in pocket windows and replace the molding.
It takes a contractor from two to four hours, on average, to install a replacement window. But unless you’re skilled, it will likely take you longer. Consider the following before you decide to DIY:
- Contractors get a discount on replacement windows unavailable to homeowners.
- Contractors are better equipped to handle problems, such as windows that don’t fit exactly and crumbling or out-of-square window frames.
- Replacement windows can be heavy, and it often takes two people to lift one and set it in the window opening. If you drop the window, you pay for a replacement. A contractor who drops one is the person who pays, not you.
- Poor installation practices, like improper sealing or omitting weatherproof frame lining, shorten the life of the window and negate the insulation benefits. A contractor guarantees work against such defects. If you do the job yourself, you assume the liability.
- DIY installation may void the product warranty.
How to Remove Scratches From Stainless Steel
Organic mulch and rock are two popular choices for home landscaping, but each has its benefits and drawbacks. Some people prefer the look and longevity of rock, while others prefer softer, lighter wood or pine needle mulch. When deciding between mulch versus rock, it’s all about your personal preference. Mulch landscaping makes your garden thrive by locking in moisture, keeping roots cool, and suppressing weed growth.
Best for:
- Garden beds with flowers, shrubs, and trees
- Gardens in dry or hot areas
- Eco-friendly gardening methods
- Those looking to spend less time weeding gardens
Advantages of Mulch
- Less watering: Mulch helps soil retain moisture and reduces surface evaporation, so you can water less often.
- More nutrients: Mulch is a natural product that adds nutrients to feed plants and soil. As organic mulch breaks down, it enriches the soil with essential nutrients such as nitrogen from grass clippings and compost, phosphorus from decomposed leaves and manure, and potassium from bark mulch and straw.
- Fewer weeds: Mulch, with its small pieces and fine texture, covers soil more completely to help prevent weed growth.
- Just the right temperature: Mulch is a natural insulator, keeping plants warm in the winter and cool in the summer. Winter mulching is particularly common among Northern gardeners.
- Easy to install: If you buy bags of mulch, it’s simple to tote them around to places where you’ll spread the goods.
Disadvantages of Mulch
- Too much mulch can be harmful. A layer of mulch more than three inches deep can stress plants. Excessive mulch can reduce oxygen levels in the soil, suffocating the roots. It can further stress the roots by attracting pests and causing them to rot.
- Timing matters: If you spread mulch too early in the season, your soil won’t warm naturally, meaning late blooms. If it’s spread too late, weeds will develop.
- Can attract bugs: Mulch retains moisture and provides a shaded environment, which makes it prone to bugs like ants, termites, and beetles. Wood-based mulches are especially attractive to pests. While ants and beetles can affect plant health, termites can significantly damage any wooden structures nearby.
What Is Rock Landscaping?
Rock landscaping, or hardscaping, uses gravel or rocks in various sizes, colors, and textures to cover soil, creating beautiful, long-lasting outdoor spaces.
Unlike mulch, rocks don’t decompose, making them a low-maintenance choice to give your yard a clean, modern look.
Best for:
- Areas with drainage issues
- Open bed areas without plants
Let’s examine the pros and cons of landscaping with rocks to determine whether it’s the right choice for your yard.
Advantages of Rock Landscaping
- Low maintenance: Rock doesn’t decay and will stay where you place it for years.
- Fireproof: If you live in an area with wildfires, rock can make a good fire break.
- Variety: Rock gives you countless options in size, shape and color.
- Fewer bugs: Unlike mulch, rock will not attract bugs or pests, which are drawn to decaying matter.
- Erosion proof: Rock can prevent soil erosion and will stay in place on hillsides or sloped yards.
Disadvantages of Rock Landscaping
- Too hot: Dark rock holds heat and raises ground temperatures. Light-colored rock reflects heat onto plants. Both increase evaporation, so you’ll need to water more.
- No benefit to plants: Rock doesn’t aid plant growth or soil health.
- Weed bed: The spaces between rocks invite leaves, seeds and weeds.
- Remove by hand: Moving rock, whether for replanting or new landscaping, is hard work.
- Too heavy: Gravel is heavy, hard to transport and not DIY friendly.
Mulch Versus Rock: Which Is Better to Use Around a House?
Here are a few factors to consider when deciding between rock and mulch for your landscaping. Mulch is more versatile for plant beds as it retains moisture and maintains soil health. However, it breaks down and fades over time, meaning you’ll need to refresh it every season to maintain its appearance and benefits.
Rocks work best in non-plant areas, like walkways, fire-prone zones, or drainage beds, where durability is key. They won’t decompose or fade, but they do require more effort to install and can retain heat, which can stress the plants nearby.
How to Get Rid of Mice With This Surprising Hack
If you want to have a home free of mice, you don’t necessarily have to buy mousetraps and bait them with cheese or peanut butter. Who wants to trap mice when you can easily keep them away with a common, perfectly safe mouse deterrent? Just make sure the corners and other dark places where they congregate and build their nests smell like peppermint. Peppermint offers a successful natural mouse deterrent that works when trying to repel mice. You can use two methods to incorporate the smell of peppermint into your home as a mouse deterrent. The first is to grow peppermint plants and leave them around the house.
If you don’t desire a home full of peppermint plants, then you might prefer using peppermint oil instead. Spray the essential oil in different areas of your home that mice can access. If you’re trying to catch the mice, strategically spray the peppermint oil in places that don’t have a mousetrap. In theory, this should lead them to wherever you have placed it.
If you have pets or small children, use the essential oil with caution, because it can be toxic in high doses. Keep the bottle out of their reach at all times and do your best to limit their access to the areas where you’ve sprayed the oil.
Mold Remediation: How to Remove Mold
- Scrub the surface mold stains from walls and wood trim with undiluted, distilled white vinegar.
- Apply with a rag or spray bottle, then let sit for an hour.
- Use a soft brush and work until signs of the mold disappear.
- After scrubbing the surfaces, wipe off but DO NOT RINSE these surfaces.
- Set trim in direct sunlight to dry. Scrub concrete with TSP or automatic dishwasher detergent.
- Set out dehumidifiers and fans to dry the now-cleaned areas for at least three days, then check them by sight and smell for mold.
- Pro tip: If you discover more mold, clean again with vinegar for mold remediation.
- When you’re sure the mold has been eliminated, seal the wood surfaces with an oil-based primer like KILZ.
- Repaint cleaned wall surfaces with a regular latex paint that contains a mildewcide to help stop future mold growth.
- Install new insulation and drywall and nail the trim back on. Keep in mind that if the moisture returns, mold will return.
Check Your Furnace Filter
Check your furnace filter monthly and change it every three months, depending on the type of filter you use. To do this: Turn off the furnace by flipping the furnace switch. It should be on or next to the furnace and looks like a standard light switch: Find the filter service rack or door. This is most likely on the side with the intake and out-take blower fan. Remove the cover. Slide out the existing filter and hold it up to the light. If you can no longer see light through it, it’s time for a new one. Once you’ve removed the old furnace filter, slide the new one in place. Find the arrow on the filter edge and point it toward the blower motor. (Putting it in backward decreases the filter’s efficiency.) Slide it in, replace the cover and turn on the furnace.Clear Snow From All Outside Vents, Meters and the Oil Fill Pipe
In the winter, snow removal becomes one of the biggest chores. Outside vents blocked by snow can lead to carbon monoxide buildup inside your home — a crucial safety issue. Check your dryer, furnace and water heater vents monthly, and especially after a snowstorm. Also make sure your gas and electric meters are accessible, and your oil or propane company has a way to deliver fuel in the snow — ideally a cleared path.What’s the Best Way to Cover Your AC Unit?
You don’t always need to cover your outdoor AC unit during winter. Most modern AC units are built to handle the elements. However, if any ice or snow builds up on the system, remove it immediately to help restore airflow and prevent rust from forming. Covering an outdoor AC unit can do more harm than good, as covers prevent proper airflow and trap moisture, leading to rust and mold growth. If you do cover your AC unit, the best time to do it is in the fall. It is not recommended to cover an AC compressor unit with a tarp, as that can trap moisture inside. Instead, choose a breathable cover with ventilation flaps or mesh panels, fitted to the unit and made of quality materials, to allow for proper air circulation. One drawback to a fabric cover is that it provides a warm spot for mice and other small animals to live, and they often like to chew on wires and create other issues. Placing a piece of plywood on top of the unit can help protect it from falling ice or heavy snow, but be sure to clear it off as needed. A piece of plywood set on top of the housing that is large enough to cover it and securing it with bricks is likely all that you will need.
What To Know About Killing Mold....
Looking for an affordable, natural product to get rid of mold? Just pick up some vinegar, one of the most powerful mold killers around. According to ServiceMaster Restoration and Cleaning, the mild acid in vinegar kills about 82% of known molds and can help prevent future outbreaks. It’s a great solution for cleaning small areas of mold on hard surfaces. But, while vinegar is a powerful mold cleaning agent, it does have limitations. You can clean small amounts of mold with vinegar yourself, but the Environmental Protection Agency (EPA) advises hiring professionals when the moldy patch covers about 10 square feet or larger. The EPA does not recommend using bleach to kill or remove mold, except in special circumstances. Most bleach contains up to 80 per cent water, which can actually help mold to develop. According to ServiceMaster, bleach is only effective at killing surface mold, which allows mold to not only grow back, but to grow back stronger. When bleach is used on porous surfaces like drywall or wood, mold membranes will move deeper into the surface to avoid the chemical. To clean mold, use regular white distilled vinegar, typically sold with five percent acidity. You can also use “cleaning vinegar” with its six percent acidity. Both are effective at killing mold, and generic brands are as effective as name brands. Depending on the amount of mold, let the vinegar sit on the mold at least 60 minutes before wiping or scrubbing. To clean a small area of mold:
Add full-strength white distilled vinegar to a spray bottle and spray it on the mold.
- Let it sit for at least an hour before wiping away mold.
- If you need follow-up scrubbing, combine one teaspoon baking soda with two cups of water. Pour it into a spray bottle, shake and spray it onto the mold. Scrub with a brush or scouring pad.
- Rinse with warm water, then spray again with the vinegar and let it dry.
To protect yourself from mold and its spores, wear gloves, a mask and goggles. Gloves also prevent any skin irritation from the vinegar
8 Tips to Help Troubleshoot Your HVAC Problems
Shut Off the Main Water Valve
Perhaps an even better option, because the cabin is going to be vacant anyway, is to turn the water off altogether at the main valve. If you do this, be sure to use an air compressor to blow all of the water out of the waterlines. “This is helpful if you will be (away) for long periods of time during freezing temperatures, to ensure that there is no still water in the pipes that could freeze and cause damage,” says Mushinski.
When your HVAC system isn’t functioning properly, it’s tempting to panic. Resist the urge. Whether it’s just not operating as it should or it’s not working at all, take these steps to try to identify the problem. The issue might be a simple fix.
Inspect the thermostat. If your HVAC system isn’t working at all or working erratically, make sure the thermostat is at the proper setting for heating or cooling and programmed correctly to turn on and off at the appropriate times. If it has batteries or is rechargeable, replace the batteries or check the charge level.
Check the electrical panel. If your HVAC system isn’t working at all, make sure the power switch at the unit is on, and check the breaker at the electrical panel. If it’s in the on position, flip it off and then on again. If it’s in the off position, flip it on.
Look at the vents. If airflow is obstructed, you’ll have cold or hot spots in your house. Make sure each vent is fully open. Clean them regularly with a broom or a cloth so they aren’t clogged with dirt or debris. Move furniture or other objects that might be blocking them and preventing air from circulating in a room.
Clean or replace filters. Your HVAC air filter keeps dust and other impurities from entering your home. Maintaining it helps keep indoor air cleaner, lets your system run more efficiently, lengthens the system’s life and reduces the chances of costly repairs. Use filters recommended by the manufacturer and set a reminder to change or clean your filter every 30 to 90 days. If you have pets or a lot of dust in your home, clean or change the filter on the shorter end—every 30 days or so. Periodically replace washable filters.
Inspect ductwork. Leaks in air ducts affect how much conditioned air gets to where it needs to go. It’s common for leaks to occur at duct joints. You can detect those with your hand when the system is running. Seal air leaks with aluminum foil tape.
Clear the area around the unit. Check the area surrounding your HVAC unit. For proper airflow, outdoor units should have several feet around them clear of plants and debris. Indoors, clear away any boxes or clutter near a unit that could obstruct airflow and access.
Look for air leaks and drafts. If your doors and windows aren’t properly sealed, or if you don’t have adequate insulation, you’ll have cold or hot spots in your home. This means your HVAC system will have to work harder. Check the attic to see if you should increase insulation. Remove trim around doors and windows, and seal any gaps with foam insulation; when you reinstall the trim, caulk around it. Check exterior doors for adequate weatherstripping, and make sure thresholds seal properly.
Rain-X in Snowblower Chute
With the snow season here again, it is helpful to give your snowblower a tune-up, and that always includes spraying the inside of the chute with Rain-X. The water-repelling spray keeps the chute from getting clogged with wet, packed snow and ice. The Rain-X makes the chute slick, and snow slides out of the chute like it’s supposed to. It can be reapplied every few snowfalls or so.
Leave Kitchen and Bathroom Cabinet Doors Open
These spaces are often along uninsulated outside walls and much colder than the rest of the space, leaving the pipes under kitchen and bathroom sinks particularly vulnerable to freezing. If you keep the heat on, leaving these cabinet doors open will allow that heat to keep the pipes a little warmer, too.How to Avoid Window Condensation in Winter
Since cold air tends to be drier, many people in colder climates run a humidifier to make the air more comfortable. And this is fine, but too much humidity is a bad thing. If condensation is forming on your windows, it also could be forming inside of your walls, causing mold or other problems. The other sources of indoor humidity are people, showers, cooking, leaky dryer vents and even houseplants. So if your windows are fogging up or frosting over here are some things you can do to reduce indoor humidity:
- Lower the setting on your humidifer.
- Turn on the bath fan when you’re showering.
- Run the kitchen exhaust fan when you’re boiling water.
- Check your dryer exhaust vent. Repair loose vent pipes and cover seams with duct tape.
Add a layer of glass or plastic to your windows.
There are several ways to add a layer of glazing to your windows. You can add storm windows, install heat-shrink plastic film or upgrade to double- or triple-glazed windows.
Additional layers of glazing provide better insulation and increase the temperature of the interior layer of glazing. Suppose it’s 25 degrees F outdoors and you have single glazed windows. The interior temperature of the glass probably wouldn’t be much above freezing. And at that temperature, even relatively dry air would condense on the glass. But, if you added a storm window, the interior temperature of the glass would be much warmer, and condensation would be less likely to occur. So, adding more layers of glazing allows you to have higher indoor humidity without frosty windows.
Crack open a few windows
Open at least one window on each floor an inch or two. Even in the depths of our winters, I always leave a window or two on each story of my house slightly cracked. The heat loss is insignificant, and the fresh, dry air from outside prevents condensation before it starts.Take note of any particularly wet windows. Crack these open first, then wait a day or two to see if the fresh air halts the condensation.
If your home is new, try opening your door for 10 to 15 minutes on cold evenings. New concrete, wood and other materials usually take 12 to 18 months to dry, and the drying-out process could be partly responsible for your window condensation.
Check your bathroom(s) for switch-controlled exhaust fans.
Let them run for a least an hour a day. If window condensation persists, run them longer.
Be sure to run your fan during all baths and showers, and for at least 20 minutes after the water stops running.
Try increasing your thermostat’s set point for a few days.